

You will need a saw, wood glue, clamps, sandpaper, and mineral oil. First, cut the wood into the desired shape and thickness. Next, glue the pieces together and clamp them until the glue dries.
Then, sand the surface of the chopping board until it is smooth. Finally, apply a layer of mineral oil to protect the wood and prevent it from drying out.
We all know that one of the most important tools in the kitchen is a cutting board. But what happens when your cutting board starts to show signs of wear and tear? You can’t just throw it away and buy a new one – that would be wasteful and expensive!
Luckily, there’s a much better solution: make your own chopping board! Homemade chopping boards are not only eco-friendly, but they’re also incredibly easy to make. All you need is a piece of wood (preferably hardwood), some sandpaper, and some mineral oil.
Once you have those supplies, simply sand down the wood until it’s smooth, then rub on some mineral oil to finish. That’s it! Your new chopping board will be beautiful, durable, and unique – everything that a good cutting board should be.
Plus, it’ll have the added bonus of being eco-friendly and cost-effective. So what are you waiting for? Get started on your homemade chopping board today!
How to Make a Cutting Board with Minimal Tools
How Do You Make a Homemade Cutting Board?
Assuming you would like a tutorial on how to make a cutting board: You will need the following supplies: -1×6 boards (8 feet long)
-wood glue -clamps -120 grit sandpaper
-stain (optional) -mineral oil (optional) Tools:
-(saw – either a hand saw or miter saw will work)
First, cut your boards to size. You will want two pieces that are 18 inches long and two pieces that are 12 inches long.
Next, take the 18-inch pieces and glue them to the 12-inch pieces using wood glue. Make sure to spread an even layer of glue over the surface area that will be touching. Once the glue is applied, clamp the four pieces of wood together so that they dry in this position.
Let the boards sit like this for at least 24 hours so that the glue has time to set up properly. After 24 hours have passed, unclamp your boards and begin sanding them down with 120 grit sandpaper until they are smooth all over. If you plan on staining your cutting board, do so now and let it dry completely before moving on to the next step.
If not, simply skip ahead to applying mineral oil. To finish up, apply a generous amount of mineral oil all over your cutting board with a clean cloth and rub it in until it’s no longer tacky to the touch. This helps protect your board from moisture and keeps it looking nice and new for years to come!
What Wood Should Not Be Used for Cutting Boards?
There are a few different types of wood that should not be used for cutting boards. These include
1. Pine – Pine is a softwood that is easily damaged and scratched. It is also difficult to clean, as it tends to absorb food stains.
2. Cedar – Cedar is another softwood that is prone to damage and staining. It is also difficult to clean due to its porous nature.
3. Redwood – Redwood is another softwood with the same issues as pine and cedar. It is also susceptible to warping over time.
4. Birch – Birch is a hardwood, but it has a very tight grain that can make it difficult to clean properly.
Birch cutting boards are also more expensive than other options.
What Kind of Wood is Used to Make a Cutting Board?
Wooden cutting boards are a staple in most kitchens. They come in a variety of sizes and shapes and can be used for a variety of tasks, from chopping vegetables to slicing meat. But what kind of wood is used to make a cutting board?
There are actually several different types of wood that can be used to make a cutting board, including maple, cherry, oak, teak, and walnut. each type of wood has its own unique properties that make it well-suited for use as a cutting board. Maple, for instance, is a hardwood that is very dense and durable.
This makes it ideal for chopping tasks as it won’t dent or scratch easily. Cherry is another hardwood that is also quite dense and durable, but it has a slightly softer grain than maple which makes it better suited for slicing tasks. Oak is another popular choice for wooden cutting boards as it is also quite durable and has a beautiful grain pattern.
Teak is often used for outdoor cutting boards as it is extremely strong and resistant to weathering. Walnut is also sometimes used for wooden cutting boards due to its attractive grain pattern. So there you have it – there are actually several different types of wood that can be used to make a cutting board!
Can You Make a Cutting Board Out of Any Wood?
If you’re looking to make a cutting board, any type of wood can be used. However, there are certain woods that are better suited for the job than others. Softer woods like pine or cedar can be used, but they’re more likely to show knife marks and will require more maintenance in the form of sanding and oiling.
Harder woods like maple or walnut are ideal for cutting boards because they’re less likely to scar and are easier to clean. When choosing a piece of wood for your cutting board, make sure it’s free of knots or cracks which could harbor bacteria. If you’re using a softer wood, look for one that’s been planed or sanded smooth to avoid splinters.
Whichever type of wood you choose, make sure it’s at least 1-1/2 inches thick so it won’t warp over time.

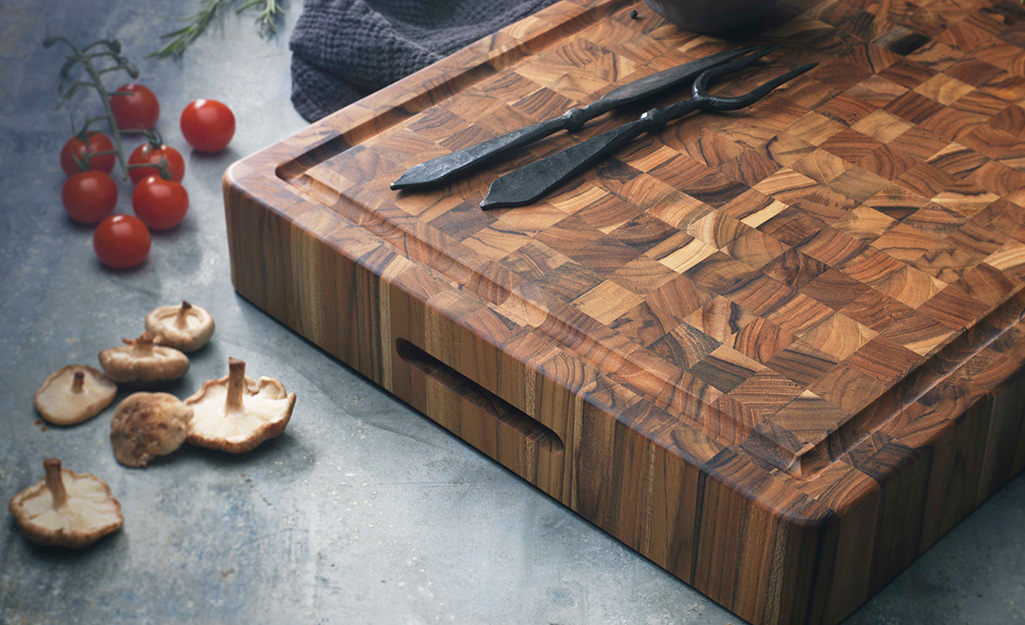
Credit: www.homedepot.com
How to Make a Cutting Board from One Piece of Wood
If you’re looking for a unique and rustic cutting board, why not try making one from a single piece of wood? It’s actually not as difficult as it sounds, and with the right tools and materials, you can create a beautiful and functional cutting board that will last for years. Here’s what you’ll need to get started:
-One piece of hardwood (we recommend at least 12″ x 18″), at least 1″ thick -A saw (either a hand saw or power saw) -Sandpaper
-Wood glue -Clamps First, use your saw to cut the piece of wood into the desired shape and size for your cutting board.
If you’re using a power saw, be sure to wear proper safety gear, including eye protection. Once the board is cut to size, use sandpaper to smooth out any rough edges. Next, apply wood glue along the edge of one side of the board.
Place another piece of wood on top of it (this will be the bottom of your cutting board), aligning the edges. Use clamps to secure the two pieces together while the glue dries. Allow the glue to dry completely before proceeding to the next step.
You may want to let it sit overnight just to be safe. Once dry, flip over your cutting board so that the glued edge is now on top. Apply more glue along this edge and clamp another piece of wood onto it (this time creating one long side of your Cutting Board).
Let dry completely before adding the final side piece in the same manner described earlier. Trim off any excess wood from the sides with either a hand saw or a power tool. Finally, sand the entire surface until smooth. Your new wooden Cutting Board is now ready for use!
How to Make a Cutting Board from a Log
If you’re looking for a unique cutting board, why not try making one from a log? It’s a fun project that can be done in the afternoon, and it’ll make your kitchen look rustic and stylish. Here’s how to do it:
1. Find a suitable log. Look for one that’s straight and has smooth bark. Avoid logs with knots, as these will be difficult to work with.
2. Cut the log into slices of desired thickness (around 1-2 inches is ideal). You can use a saw or axe for this step.
3. Sand the edges of each slice to make them smooth. Use progressively finer grits of sandpaper until the edges are soft to the touch.
4. Apply a food-safe finish to the cutting board. This will protect it from bacteria and moisture damage. You can use mineral oil or beeswax for this step.
5 Allow the finish to dry completely before using your new cutting board!
How to Treat a Homemade Cutting Board
If you’re like me, you love having cutting boards around the house. They make meal prep so much easier and faster. But what do you do when your cutting board starts to show signs of wear and tear?
Here are some tips on how to treat a homemade cutting board: 1. If your cutting board is made from wood, it’s important to oil it regularly. This will help keep the wood from drying out and cracking.
You can use any type of food-safe oil, such as olive oil or mineral oil. Just pour a small amount onto the board and spread it around with a clean cloth. Let the oil soak in for at least an hour before using the board again.
2. If your cutting board is made from plastic, you can disinfect it with vinegar or bleach. Just mix equal parts vinegar and water (or bleach and water), and scrub down the board with a sponge or brush. Rinse well with clean water and dry completely before using again.
3. No matter what type of material your cutting board is made from, it’s important to wash it thoroughly after each use. I like to use mild dish soap and warm water for this task.
Diy Cutting Board Designs
A cutting board is a vital kitchen tool that every home cook should have. But why settle for a boring, functional cutting board when you can have a stylish one that doubles as a decoration? We’ve rounded up some of the most creative DIY cutting board designs that are sure to make your kitchen more beautiful and your meal prep more enjoyable.
Whether you’re looking for a simple end-grain cutting board or something more elaborate, we’ve got a design for you. And if you’re new to woodworking, don’t worry – we include detailed instructions and plans for each project so you can get started right away. So what are you waiting for?
Get inspired and start building your own unique cutting board today!
How to Make a Simple Cutting Board
When it comes to kitchen cutting boards, there are two main types: hardwood and softwood. Hardwood cutting boards are made from denser woods, like maple and walnut, while softwood boards are typically made from pine or poplar. If you’re looking for a durable board that will last for years, go with a hardwood option.
But if you’re on a budget or prefer a lighter board, choose softwood. No matter what type of wood you select, look for a board that is at least 1 inch thick. Thinner boards are more likely to warp and crack over time.
When it comes to size, choose a board that is large enough to comfortably accommodate the foods you typically prepare. If you do a lot of entertaining, opt for a larger size; if you cook for just yourself or your family most nights, a smaller board will suffice. Once you’ve found the perfect cutting board, it’s time to prep it for use.
Start by sanding down the surface with medium-grit sandpaper until it’s nice and smooth. Then rinse the board with warm water and dish soap to remove any sawdust or debris that may be lingering on the surface. Finally, dry the board thoroughly before using it; moisture can cause wood-cutting boards to warp or crack over time.
How to Make a Cutting Board Food Safe
If you’re like me, your cutting board gets a lot of use. It’s the perfect surface for chopping vegetables, slicing meat, and mincing garlic. But over time, even the best cutting boards can start to show signs of wear and tear.
And if they’re not properly cared for, they can become a breeding ground for bacteria. That’s why it’s important to make sure your cutting board is food safe. Here are a few simple tips to help you keep your cutting board in tip-top shape:
1. Wash your cutting board regularly with hot, soapy water. If you have a wooden cutting board, be sure to avoid soaking it in water or putting it in the dishwasher, as this can cause the wood to warp or crack.
2. After each use, disinfect your cutting board with a solution of 1 tablespoon bleach per gallon of water (or vinegar). Let the solution sit on the board for several minutes before rinsing it off with clean water.
3. Periodically deep clean your cutting board by scrubbing it with a paste made from baking soda and water. This will help remove any built-up residue that could be harboring bacteria.
4. Inspect your cutting board regularly for signs of wear and tear such as cracks or nicks in the surface. If you find any damage, throw out the affected portion of the board and replace it with a new one immediately!
How Do You Seal a Homemade Cutting Board
A homemade cutting board can be a great addition to your kitchen, but you need to make sure that it is properly sealed in order to protect it from moisture and bacteria. There are a few different ways that you can seal a cutting board, and the best method for you will depend on the materials that you used to make it. If your cutting board is made of wood, then you will need to use a food-safe sealant in order to protect it.
You can find these sealants at most hardware stores, and they will help keep your cutting board looking new for years to come. Apply the sealant according to the manufacturer’s instructions, and make sure that you reapply it every few months in order to keep the surface protected. If your cutting board is made of glass or ceramic, then you won’t need to worry about sealing it since these materials are naturally non-porous.
However, you should still take care of your cutting board by washing it with soap and water after each use. Glass and ceramic boards are also more susceptible to breakage, so be careful when using them! No matter what type of cutting board you have, make sure that you take care of it by cleaning it regularly and storing it properly.
With a little bit of TLC, your homemade cutting board will last for many years to come!
How to Make a Cutting Board With Hand Tools
If you’re looking for a unique and personalized cutting board, why not try making your own? With just a few hand tools and some basic woodworking skills, you can create a one-of-a-kind cutting board that will be the envy of your friends and family. Here’s how:
Start by selecting the wood for your project. Hardwoods like maple or walnut are ideal, as they’re durable and won’t dull your knives. Avoid softer woods like pine, as they’ll likely warp over time.
Cut the boards to size, then use a router to round over the edges. This will give them a nice smooth finish and prevent them from splintering when in use. Next, it’s time to add the finishing touches.
Apply a food-safe mineral oil to the surface of the boards using a clean cloth. This will help protect them from water damage and keep them looking their best. Finally, use a rubber mallet to gently tap on any metal handles or hardware you’d like to add – this will give your cutting board an extra touch of style!
Conclusion
A homemade chopping board is a great way to add a personal touch to your kitchen. Plus, it’s a lot cheaper than buying one! You can make a chopping board out of almost any type of wood, but hardwoods like maple or oak are best.
The key is to sand the wood well and finish it with mineral oil or beeswax to protect it from water damage.